HTML Block
HTML Block Overview
The HTML Block is the Swiss Army Knife of the ISD Site Editor block list. It can be used to do just about anything. Even more, the block supports inline editing. You simply click in the block and start typing. A fancy toolbar appears with three rows of icons to help you accomplish your task. The remainder of this document will cover some of the special tools available in the toolbar.
Note: If you're ever unsure about what a button does, simply hover your mouse over it. Some (hopefully) descriptive text will appear to give you more info.
Formatting Tools
These tools should be fairly familiar as they are commonly found in other word processing programs like Microsoft Word.

I'm going to go through these buttons rather quickly. I'll be starting with the first icon in the second row and progressing through the highlighted icons in the image above from left to right. I'll try to describe the button appearance first, in case you can't see the image for some reason.
Bold - The 'Big Letter B' button will bold any text that you have highlighted or activate bold for the text you are about to type.
Italics - The 'Slanted Letter I' button will italicize any text that you have highlighted or activate italics for the text you are about to type.
Underline - The 'Underlined Capital U' will underline any text that you have highlighted or activate underlining for the text you are about to type. Note: Please avoid using underlining as much as possible. On the web, hyperlinks are the only thing that should be underlined, and that underline happens automatically when you create the link. Helpful Hint: In the land of the of the web, book titles aren't underlined anymore. I suggest italics or quotations marks.
Strike through - The 'Capital S with the Line Through It' button will strike through any text you have highlighted or activate strike through for the text you are about to type.
Subscript - The 'little x with an itty bitty 2 hanging below it' button will turn your highlighted text into a subscript or will activate subscript for text you are about to type.
Superscript - The 'little x with an itty bitty 2 floating above it' button will turn your highlighted text into a superscript or it will activate superscript for the text you are about to type.
Clear Formatting - The 'Underlined Capital T with the Little x hanging off of it' will clear any formatting from the text you have highlighted or will remove the formatting from text you are about to type.
Numbered List - The 'little 1 and 2 with squiggles to the right of them' will turn your highlighted text into a numbered list or it will activate numbered list mode for the text you are about to type.
Bulleted List - The 'two little circles with squiggles to the right of them' will turn your highlighted text into a bulleted list or it will activate bulleted list mode for the text you are about to type.
Decrease Indent - The 'little left facing arrow with lots of squiggles to the right of it' will decrease the indention on numbered or bulleted lists.
Increase Indent - The 'little right facing arrow with lots of squiggles to the right of it' will increase the indention and list level on numbered or bulleted lists.
Left, Center, Right, Justify Alignment - The next four buttons modify the alignment of the contents of your block. The contents can be left, center, right aligned, or justified to take up the full width of the block.
Styles - The styles drop down has some preformatted style choices for you to use on your blocks.
Paragraph Format - The Paragraph Format drop down allows you to format your text according to web standards. Options include 'Normal' for normal paragraph text and six different Headings options for bold headings used throughout your page.
Font - The font drop down lets you change the font in your block. Sadly, Comic Sans is not one of the available font options with this system.
Size - The size drop down will let you change the size of your text.
Text Color - The 'Underlined Capital A' allows you to change the color of your highlighted text or sets a new text color for the text you are about to type.
Background Color - The 'White Capital A in the Dark Gray Box' allows you to set the background color of the text. Note: This does not change the background color of the entire block. Just the color immediately behind the text. Please use this sparingly.
Inserting Images
A picture is worth a thousand words, unless it's an animated gif, then it's worth like ten billion words. - Jace
It's always fun to spice up a web page with so awesome imagery (and not just the poetic kind). Inserting images into an HTML block is pretty simple. Note: The three supported image types are JPGs, PNGs, and GIFs (even the animated kind).
- Make sure your image has been uploaded with the upload cloud.
- Place your cursor where you want the image to appear. If you want text to wrap around your image, make sure your cursor is at the beginning of a paragraph.
- Click the Image icon in the toolbar (
 ). The image window will appear.
 - In the second dropdown box (labeled Uploaded Images) find your image.
- Click Ok
That's all there is to it. You now have an image in your HTML block. If you need to update image settings, you can right click on the picture and choose Image Properties.
Additional Image Properties
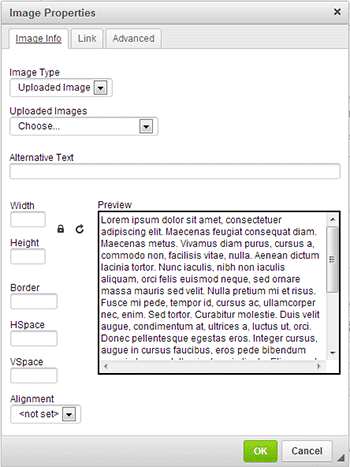 The Image Properties window has quite a few options that you can set for each image.
Alternative Text - This is text that is displayed when the picture can't be for some reason. This text is also sometimes used by web browsers for the visual impaired to describe the image to the user.
Width - Resize the image's width
Height - Resize the image's height
Padlock - If the padlock is in the 'locked' setting, adjusting one dimension will automatically update the other and keep the aspect ratio the same as the original image. Unlocking the padlock will let you change the sizes independently.
Border - Specify a number for the thickness of the border around the picture.
HSpace - Specify a number here to add padding around the left and right sides of the image. This is useful if you have the alignment set to left or right and text is wrapping around the image.
VSpace - Specify a number here to add padding above and below the image. This is useful if you have the alignment set to left or right and text is wrapping around the image.
Alignment - Setting the alignment to left or right will float the image to the specified alignment and allow the text to wrap around the image.
Note: A lot of people are confused by the weird text in the Preview section. That's just filler text known as Lorem Ipsum. It's just there to show you what the image will look like if it is near your text. The Lorem Ipsum will not show up on your page.
Creating Links
Did you know that the original purpose of the world wide web was to create links between documents? Now you know!
Links are an integral part of making your website really useful. So, let's go over the basics.
- Start by typing the words that you will eventually turn into the hyperlink. Note: Make the text that you are going to turn into a link descriptive. *Begging* Please try really, really, really hard not to include CLICK HERE in your link text. It is redundant and amateurish. Think about it this way, if a user found your site, there is a really high probability that they are familiar with hyperlinks and will understand that underlined text can be clicked to navigate them elsewhere. I'll end my rant with some maths:
(Descriptive link text > 'click here' text) </rant> - After you've got your link text typed in your block, highlight it.
- Now click the Link icon (
 ). The Link Properties window will appear.
 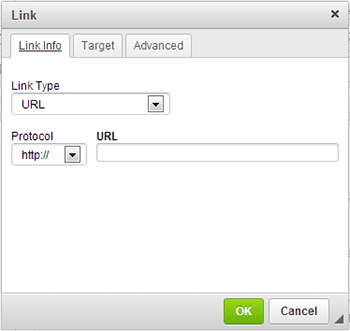 The Link Properties window is where you provide the address to where you want the link to go when it is clicked. You have some options here.
- The Link Type dropdown allows you to specify what you want to link to. By default, it's set to URL.
- URL - You can type in a valid url (eg. http://www.google.com). This option is useful when linking to other sites.
- Site Pages - Use this option when you want to link to another page on your web site. When you select this option from the dropdown another dropdown will appear listing each page on your site. Simply choose the page you want to link to.
- Uploaded Files - Similar to Site Pages, this lets you create a link to a file that you uploaded to the site. This is how you would make links to PDFs or Images. Note: Make sure you upload your files to the cloud before you click on the Link icon. If you try to upload with the Link window open, you'll need to cancel the window and try again so it can process the newly uploaded files.
- Link to anchor in the text - UHOH. This option is broken. Don't use it right now. It's on one of my famous lists. It will get fixed. One day. (See this work around)
- Email - This option makes it really simple to create a link that will open the user's email client and create a message to send.
- Target Tab - Notice the Target tab at the top of the window? Setting a link target will let you specify how the web browser should open the link when it is clicked. By default, all links will open in the same tab or web browser window as the page that contained the link. If you want to have a link open in a new tab you'll need to specify a target.
- Let me make it easy on you. I've been doing web development for almost 14 years now (ew, I've never actually thought about how long I've been doing this before) and I've never used a target option other than the 'New Window (_blank)' option. So if you want the link to open in a new tab or window (depending on the browser) use that option.
- The Link Type dropdown allows you to specify what you want to link to. By default, it's set to URL.
Anchors (Or Links to Different Sections of Your Page)
Sometimes it is useful to create a link to a different section on the same page as the link. For example, the page you're on has a nice 'Page Content' block in the left column that has links to the different sections of this page. That kind of link is called an Anchor. Anchor links are just a bit tricky at the moment but they're not impossible. Let's walk through the process.
- For an Anchor link you actually need two pieces of text to exist on your page. One of the pieces of text becomes the link that is clicked, and the other becomes the anchor or the place on the page you want the link to navigate to. So make sure you have both pieces of text on your page before you continue. Note: The rules about descriptive links applies to anchor tags as well. Also, it's a good idea to use Headlines as your anchor. It just makes sense.
- Once you have your text, you first need to create your anchor spot. Highlight your anchor text and click the anchor icon (
 ). A small window will appear that will ask you for an anchor name. You can use any text for a name, but it CANNOT HAVE SPACES. It's also a really good idea to not use numbers, punctuation, or other special symbols; plain old letters work the best. You need to remember what you name it because you'll use the name to make the link. Click okay once you've provided a name. Note: If you have more than one anchor on a page, each anchor must have a unique name.
 - Now you have to create the link. This is the part that is a tad tricky at the moment. Highlight your link text and click the link button () as if to make a normal hyperlink.
- Choose URL from Link Type section. (It's probably already chosen since it's the default option.)
- Now you have to type the full address of the page you are currently working on. Quick hint, look up at the URL bar right now. Now back down here. Now back to the URL bar. Back to here... That's almost the address you need. You can copy and paste that into the box then just delete the '/editor' part. The window will automatically remove the 'http://'. Don't keep trying to type that. It is fruitless. Now that you've pasted the full address of the page and deleted the 'editor', we need to add the anchor name to the end. So, at the end of the URL add '/#anchorname'. To repeat, you put a forward slash, the pound (or hash) sign, and then the name of the anchor you want to point to. So, if I was creating a link to an anchor on this page called creatingLinks my full URL would be:
sites.isdschools.org/tech_support/isd-site-edior-html-block/#creatingLinks - Click Ok on the Link window. Voilà, you've done it.