Page Editor
Editor Overview
The Page Editor is the awesomeness behind this entire tool. It allows you to do inline ediing of your web pages. This means that most of the time the live view will look almost identical to the editor view. And, in most instances, editing the content is as simple as clicking and typing.
Menu Bar

The same menu bar will appear at the top of every page you edit. Let's quickly go through what all the buttons do.
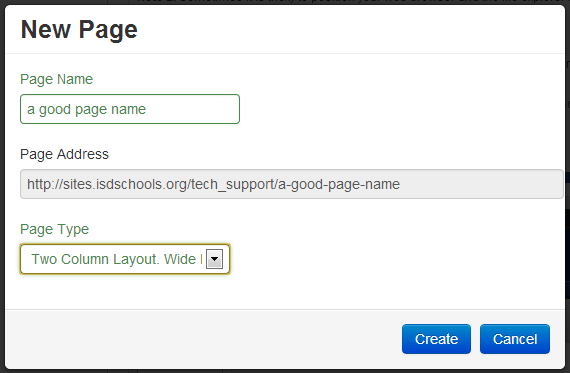
- New Page - If you guessed that this button would help you create a new page, you'd be right! Specifically, a window will open allowing you name your new page and choose its layout.
- Save Page - This button should be your friend. Click it often and make sure you seen the green confirmation message that your page was saved. If you don't see the message, you may need to logout and log back in. Note: If you are editing a block, make sure to click outside the block in any blank space to set the block's content before you click save. If you don't, the changes you made won't actually be saved.
- Delete Page - Any page you create can be deleted. You will have to confirm your cruel intentions after clicking this though. Note: Your homepage [labeled as index] can not be deleted.
- Page Properties - Options are fun. This button will open a window and let you see the options for the page you are currently working on. You can set the page to be hidden (from EVERYBODY) and you can change the layout template. Note: Did I mention that if your page is set to Hidden, nobody (except you in edit mode) will be able to see the page.
- Add Block - This is where the magic happens. Clicking this button will open a dropdown list of blocks you can add to your page. We'll discuss these in more detail elsewhere.
- Pages - Once you start adding pages to your site, you'll need a way to get to them so you can edit them. Clicking this button will open a dropdown list with the other pages of your site listed. Clicking a page in the dropdown will take you to the edit screen for that page.
- Site Properties - This is a shortcut to the Site Properties page. Remember, you can add editors and change the theme and color scheme on the Site Properties page.
- My Sites - This takes you back to the Your Sites page that lists all the sites you are able to edit.
- Logout - I'm not quite sure what this one does, but I have a feeling it may have something to do with logging you out of the system. Just a hunch, though.
Uploading Files
Recent advancements in web browsers has made the ability to upload files pretty easy. The ISD Site Editor leverages those advancements to make uploading files fast and fun (YES FUN! Well, at least I find it fun.).

I'm the upload cloud. Weeee!!!
The icon pictured to the right should be hiding on the left side of your screen just below the menu bar. It's the Upload Cloud! Let's upload some files!
- Find the file(s) you want to upload on your computer. You'll likely use My Computer for this.
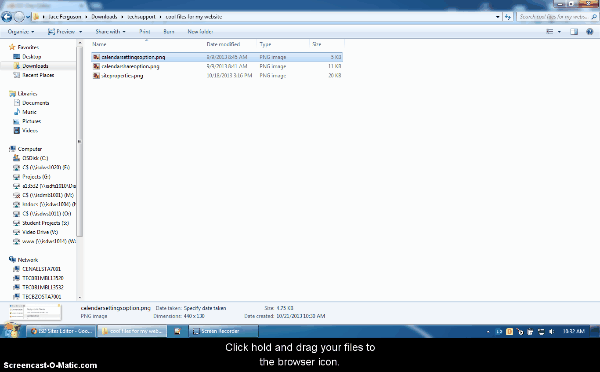
- Once you've found your files, you'll need to Click, Hold, and Drag them to the upload cloud. When you hover over the cloud, it will expand. That's your cue to let up of the mouse button.
- Watch your file(s) quickly upload.
Note 0: The upload cloud window will stay open for a few seconds after you drop your files. This is a known bug. It will wave goodbye to you before it leaves because it's a friendly little cloud.
Note 1: You can drag multiple files and once. Just highlight them all (hold down the Ctrl button while you click each one) and then drag and drop them on the upload cloud.
Note 2: Sometimes it is tricky to position your web browser and the file explorer in a way that you can see both at the same time. If you're having this problem, try this method instead.
- Maximize the file explorer so it's the only thing you see on the screen.
- Click, hold, and drag the files you want to upload to your web browser's icon at the bottom of the screen in the Windows toolbar. DON'T LET GO YET.
- After you hover over the icon in the toolbar, that window will pop up on the screen, now you can drag the files to the upload cloud and release.
Visual Learner? Here's an animated gif to show you how!
Creating a New Page
Creating a new page isn't hard at all. Naming the page is the tricky part. - Jace
The above quote is apropos in this situation. Creating a new page IS really easy, but you should spend some time thinking about what to name the page. I'll talk about why in just a second. (Oh, and yes, I did just come up with that quote for this section.)
To create a new page, start by click the New Page button in the menu bar. The following window will appear.
Super Important Note: Make sure you save the page you're working on before creating a new page. After you create the new page it will take you to that page for editing. Any unsaved changes you made to the current page will be lost. FOREVER.
The Easy Part
Let's start with the easy part first. The New Page window lets you choose the page type (layout) for the page you are trying to create. The options here depend on the theme you have chosen for your site.
The Hard Part
Naming your new page is not something you should do willy-nilly. Take a few seconds and put some thought into the name because 1) it can't be changed once the page has been created and 2) the name also becomes the address for this page. Let's talk for just a minute on what makes a good name.
Name Theory
The name of your page becomes the address (URL) that that particular page can be accessed from. You want to make sure that your name is descriptive and informative. URLs work best if they are short, easy to remember, and related to the page content. It's actually not that hard but here's an example to drive the point home.
|
BAD http://www.isdsports.org/?page_id=8 Reasons it is bad:
|
Good http://sites.isdschools.org/tech_support/isd-site-editor-page-editor Reasons it is better:
|
So that's really all there is to it. You have 40 characters to work with. Make your page names descriptive and memorable.
(Oh, and if you really don't like a name you chose, simply delete the page and try again. Though you should probably do this before you add content to your page.)
Page Properties
There isn't much to change in the Page Properties window, but here's a quick bit of info if you're interested.
Clicking the Page Properties button makes this window magically appear.
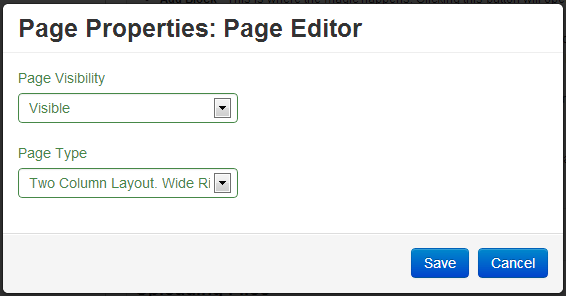
Page Visibility - If your page is set to Visible then everyone can see it! If it is set to Hidden then only you can see it in edit mode.
Page Type - Don't like the layout of your page? You're more than welcome to change it. After changing, you may have to move around some blocks.