Editing Your Profile
Profile Edit Screen
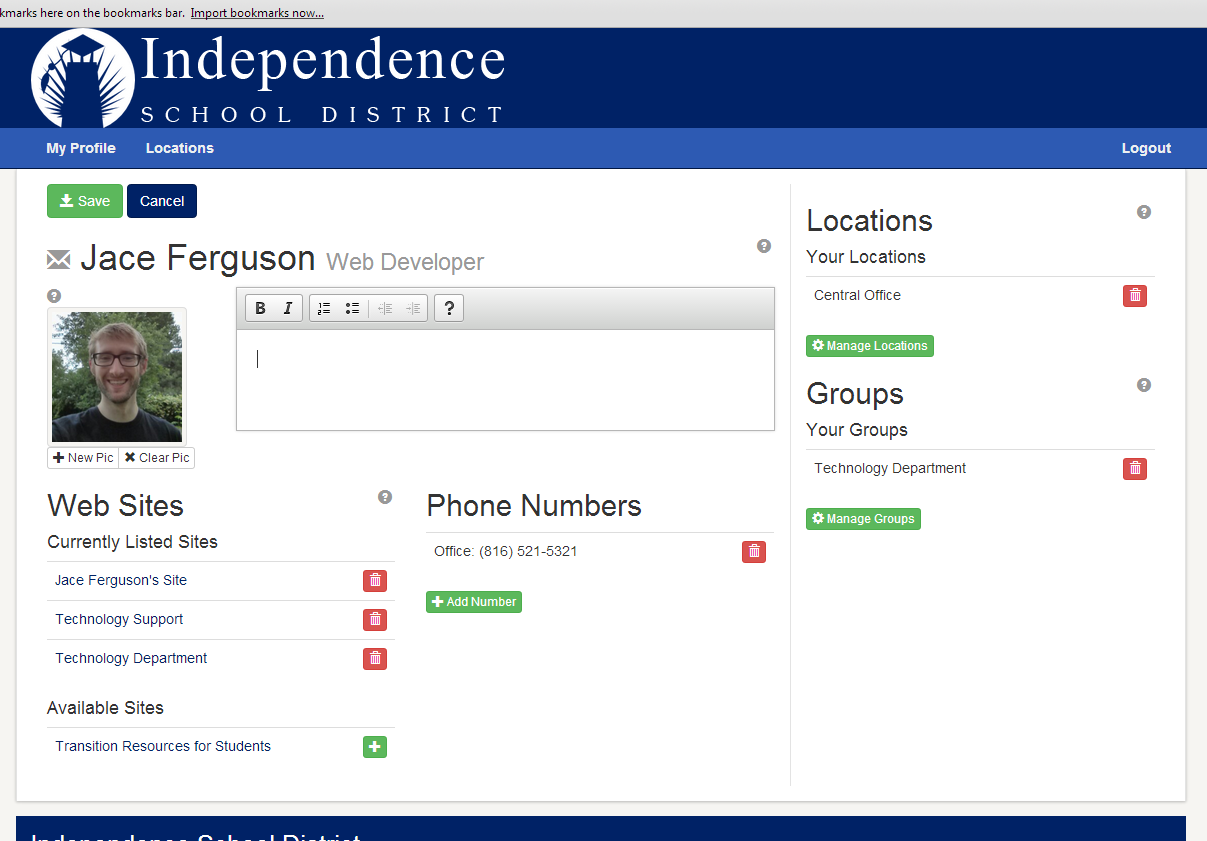
After you create your profile, information from our Active Directory will be copied into this system to give you a place to start. However, you have some options that will need to be set. Let's go over the different parts of the profile edit page.
Left Column
- Button bar for saving your work
- Your email, name, and district title. Note: This information is pulled from Active Directory and can not be changed on this screen. If this information is not accurate, please contact the technology helpdesk to have it updated.
- Your profile picture
- Your blurb
- Your ISD Site Editor web sites
- Your district phone numbers
Right Column
- The locations that your profile will appear
- The groups that your profile will appear
Button Bar
THE SAVE BUTTON IS YOUR FRIEND. Whenever you make a change to ANY information in your profile, you must remember to click save to actually store your changes. If you do not hit save, the changes that appear to have been made will revert when you go and view the public view of your profile.
The cancel button will close the editor and cancel any changes you have made since your last save.
Profile Blurb
The text editor to the right of your profile picture allows you to type up a short blurb. This section could be used to list your room numbers, class schedule, or professional information about yourself. The blurb should NOT contain links, homework listings, time sensitive information, classroom details, etc. Use an ISD Site Editor site for information like that and link the site to your profile.
Profile Pic
You can upload a custom picture to your profile. Please make sure that your profile picture meets all of the following guildelines:
- The image is current
- Your face is clearly visible
- You are the only person in the picture
- The scene is professional
- The image is big enough so as not to look grainy or blurry
Adding a Picture
- Click the 'New Pic' button, an Image Chooser window will appear
- Open the folder on your computer that contains your profile picture. Manipulate that folder so you can see the picture file and the Image Chooser window.
- Click, hold, and drag the file from your folder to the Image Chooser window. Release your mouse once the image is in the window.
- Wait for the image to upload.
- Left click the image to select it
- Click the 'Choose Selected' button
- You will be asked to crop the picture. The picture that will be used on your profile must be square. If the image you uploaded is square, you can choose to use it as is. If the image you uploaded is not square, you must crop it. To crop, click, hold, and draw a box around the portion of the image you want to keep.
- Click Crop to crop and save your profile picture.
Removing your Picture
Click 'Clear Pic' to remove your profile picture. Your picture will be set back to the default.
Phone Numbers
You can add as many phone numbers to your profile as you'd like.
Adding a Phone Number
- Click 'Add Number'
- Choose the 'Phone Number Label' for the number you are going to add
- Enter the phone number. The format must be (###) ###-#### ext. #####. (Though the extension information is optional
- Click 'Save Number'
Removing a Phone Number
To remove a phone number from your profile, click the red Trash button to the right of the phone number.
Web Sites
The directory allows you to link your profile with websites that you have created with the ISD Site Editor. In edit mode, your profile will show you any websites that you currently have linked to your profile as well as any websites that have yet to be link. The listing will include ALL websites fromt he ISD Site Editor where you are the Owner or an Editor of the site. If you do not have an ISD Site Editor site, you can create one, then come back and link it to your profile. Note: Only sites built with the ISD Site Editor can be added to your profile.
Adding a Website
In the 'Available Sites' section, click the green Plus button to the right of the website name.
Removing a Website
In the 'Currently Listed Sites' section, click the red Trash button to the right of the website name.
Groups
Some locations have a secondary level of organization called groups. Groups are optional and you do not have to assign your profile to groups.
Click 'Manage Groups' to see what groups you can assign your profile to. Note: If there are no groups listed after you click 'Manage Groups', then your profile is not assigned to a location that has any groups.
Adding a Group
- Click 'Manage Groups'
- Locate the group you want to assign your profile to.
- Click the green Plus button to the right of the group name
Removing a Group
To remove your profile from a group, simply click the red Trash button to the right of the group name.
Locations
The Locations section is one of the most important.
Assigning your profile to locations is how your profile gets listed in the directory. If you do not assign your profile to a location, your profile will not be visible to users looking for your contact information. Note: You should only assign your profile to locations that you are frequently at. You can assign your profile to more than one location. This feature is handy for traveling teachers.
Adding a Location
- Click the 'Manage Locations' button.
- Locate the location you want to assign your profile to.
- Click the green Plus button to the right of the location name.
Removing a Location
If you want to remove your profile from a location, click the red Trash button to the right of the location name.